
MidjourneyIt’s been a long time coming for the release of a much-anticipated new feature called “Character Reference.” It allows you to specify reference images that define the character you want to keep consistent across your images.
Character Reference works great for duplicating a single character, but what about multiple characters? 🎎
In this article, I’ll share 3 advanced techniques to master character consistency, including generating multiple consistent characters like the image below.
Today's content will be divided into three parts. First, a brief description of the new features
Part 1: What is a "Character Reference"
Part 2: How to use the Character Reference
Part 3: 3 Advanced Tips for Using Character Reference
Part 1: What is a "Character Reference" 🎨
"Actor References" allow us to create characters based on existing character images provided via URLs.
It aims to make the character match the reference image, allowing us to create consistent characters across different images and in different styles.
Highlight Features
•⚒️ Functionality: This function is similar to the regular image prompt, but it is "focused" on character features
-👉🏻 Use: Enter -cref URL after the prompt and add the URL of the character image
-📝 Format: /imagine [text prompt] -cref URL
•🖼️ Compatibility: For Midjourney V6 and Niji 6
Use -cw to make changes
You can use -cw to modify the reference "strength" from 0 to 100.
-cw 100 (default) Use of face, hair and clothing
-cw 0 focuses on the face
Part 2: How to use the Character Reference
Step 1: Choose your reference image
Use an image you generated with Midjourney or a local file to select one.

Step 2: Upload the image copy the URL
Upload an image. Copy the image URL.


The following is the introduction of the "mat map" expansion

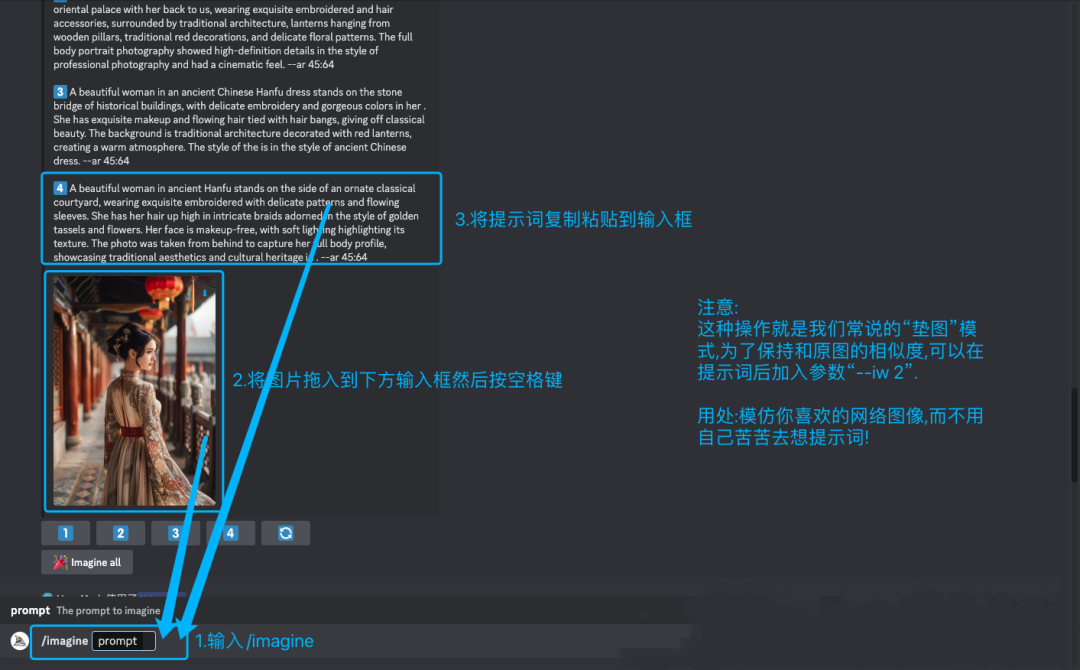

Step 3: Enter the prompt
Type /imagine as usual. then enter your prompt, describe the image you want to generate and add the -cref URL

A digital painting of a girl -cref URL
Digital painting of a girl -cref URL

A photo taken in blue hours in the street-cref URL
Street blues moments in photos -cref URL

Part 3: 3 Advanced Techniques for Mastering Character Consistency
You can do more customization via parameters and hint weights. In this section, I will describe some techniques you can use to adjust the style of the generated images:
Tip 1: Use -cw to change styles
Tip 2: Use Pan to create multiple consistent characters
Tip 3: Create multiple consistent characters in different styles
⭐️ Advanced Tip 1: Using -cw to change styles
With -cw you can convert a virtual character to a photo and vice versa. You can use -cw to modify the reference "intensity" from 100 to 0.
First, let's look at how the weights affect the results.
👉🏻 Here's what -cw does:
- -cw 100 is the default value, using face, hair and clothing
- -cw 99 to -cw 1 will begin to reduce pickups for the entire character
- At intensity 0 -cw 0 picks up face only

👯♀️ Use -cw 0 to change styles
With -cw 0, the system will focus on the face, which is good for changing clothing/hair styles, etc. This is similar to "face swapping". This is similar to "Face Swap". It's good for completely changing art styles.
Just add the style to your prompt
01. cyberpunk style -cref URL -cw 0 Cyberpunk style -cref URL -cw 0

02. digital painting of a girl drinking coffee -cref URL -cw 0
Digital patining of the girl drinking coffee -cref URL -cw 0

03. girl reading in the library -cref URL -cw 0A girl reading in the library -cref URL -cw 0

04. A girl standing beside the neon light -cref URL -cw 0A girl standing beside the neon light -cref URL -cw 0

📌 With -cw 0, the system prioritizes the face, making it easier for you to adjust hair, clothing, and overall artistic style.
⭐️ Advanced Tip 2: Use Pan to create multiple consistent characters
The best way to put multiple "-cref-based" characters into an image is to use "PAN" - a function that extends the image canvas in a selected direction. Extending the image canvas in selected directions
Let’s get started
Step 1: Turn on high variance mode
First, use /settings to turn on "Remix Mode" and select "High Variation Mode".

Confirm that the two buttons in the blue box are green, indicating that they are turned on
📌 This allows you to change the prompt while panning.
Step 2: Choose an image of a character
Find the image and use the "U" button to zoom in on the selected image

Step 3: Use Pan
Use "Pan" and choose the direction the new character should go ➡️⬅️⬆️⬇️

Step 4: Add a second character by changing the prompt
Describe the details of how you want the second character to appear in the image

result
This will stitch together a completely new image containing the first character with the new one.
By repeating the same steps with the same -cref URL, you can keep creating different scenes.

📌 Tips:
Sometimes the image may look a little awkward, try:
• If you are looking for more precise image generation, add more hint word details
• Use Vary Region to make adjustments
⭐️ Advanced Tip 3: Create Multiple Consistent Characters in Different Styles
This is a more advanced step that can take your creation to the next level!
We were able to change the overall style of both characters while still maintaining consistency.
Let's create a new style for each character
Step 1: Change the style with -cw 0 (see Tip 1)
Remember what we did with -cw 0. We can change the style of each character and use -cw 0 to keep the faces

Original Image
Tip: Cyberpunk style -cref URL -cw 0
In cyberpunk style -cref URL -cw 0

Cyberpunk style
Step 2: Save the New URL
Save the new URL for the male character that will be used with -cref
Step 3: Translate the image of the girl character
Zoom in on the image of one of the girl characters. Pan the steps of the image and enter the prompt with the new -cref URL.
You can also use Zoom and Vary Region to add more settings and dynamics


"-cw 0″ retains only facial features
More "Character Reference" Notes
•✅ This feature works best when using characters generated from Midjourney images. It will not work with real people/photos (might distort them like regular image prompts)
•✅ Cref works similar to regular image hints, but it is "focused" on the visual features of the character
•✅ Character attributes work well with large attributes (e.g. curly hair, pink sunglasses)
•❌ It will not replicate small details like exact dimples, freckles/or t-shirt logos.